
Alt Text
Introduction
Images do real instructional work in your course. A labeled diagram, a graph, a worked problem, or a photo can carry information students need to meet a learning objective. Alt text (short for “alternative text”) is the written description a screen reader or other assistive technology announces in place of an image, so students who are blind or have low vision receive that same information. Clear descriptions help other students, too, such as when an image fails to load, when someone is working on a phone, or when small details are hard to see.
Writing good alt text is a quick skill you can build, and it is part of meeting accessibility guidelines for online education. This tip sheet walks you through three decisions: whether an image needs a description at all, how to write one that works, and how to handle the complex diagrams and equations common in STEM courses.

Understanding Web Content Accessibility Guidelines (WCAG)
Under Title II of the Americans with Disabilities Act (ADA), federal regulations establish accessibility requirements for web content and mobile apps provided by state and local governments, using WCAG 2.1 Level AA as the technical standard. This includes Level A criteria, such as Success Criterion 1.1.1, which requires a text alternative for every meaningful image. Decorative images should be marked so assistive technology can ignore them.
A Closer Look
Is It Decorative, or Does It Teach?
Before you describe an image, decide what job it does on the page. Some images teach, showing data, steps, relationships, or anything a student must understand to learn. Others are purely decorative, like a stock photo at the top of a page, and add no instructional meaning.
If an image is decorative, mark it as decorative so screen readers skip it (in most tools, this means leaving the alt text empty, or alt=””). Silence is better here than hearing “stock photo of a laptop on a desk” read aloud in the middle of a lesson. If the image teaches, it needs a description. The next section shows you how to write one.
Decorative Image Example

Alt text: A decorative banner of abstract circles and bars, shown as an example of an image with no instructional content.
Caption: An ornamental banner. On a course page, an image like this would be marked as decorative and given empty alt text. It is described here only because it serves as an example.
Write Alt Text That Works
Good alt text is short and purposeful. Lead with why the image is in your lesson, and describe only the details that serve that purpose, not every visual element. Aim for 1-2 sentences, with about 150 characters as a practical ceiling. Shorter descriptions are easier to follow when read aloud, and Canvas’s built-in Accessibility Checker flags alt text of 120 characters or more. When an image needs more explanation than that, use one of the approaches in the next section.
Here are a few habits that make your alt text stronger:
- Skip “image of…” and “picture of…” because screen readers already announce that it’s an image.
- Include essential text shown in the image, such as labels or key data, unless it already appears nearby on the page.
- If your alt text is a complete sentence, end it with standard punctuation.
- Don’t repeat a caption or sentence that already gives the same information.
Well-Written Alt Text Example

Poor: “A patient and a provider.”
Better: “Nurse takes a seated patient’s blood pressure using an arm cuff.”
The stronger version names who is doing what, which is the reason the photo is in the lesson.
Describing Complex and STEM Images
Graphs, free-body diagrams, circuit schematics, data tables, and worked problems usually hold more than one sentence can carry. For these, use a two-part approach: short alt text that states the takeaway, plus a longer description that carries the full detail. Put the long description where it fits best. Options include a figure caption, the text right around the image, a linked description below the image, or a real data table when the image is essentially a chart of numbers. A caption or description immediately before or after the image benefits every student, not only screen reader users.
For STEM images, the longer description should include everything a student needs to interpret the figure: all axis labels and units, every numerical value, support and load types, angles and dimensions, symbols and legends, and how the parts connect. For a worked solution, transcribe the equations and the final answer. The test is simple: Could a student using a screen reader answer the same question a sighted student could?
Example Alt Text for Complex Images
Example 1: Bar Graph
Short alt text gives the takeaway; the data table beside or below the image gives every value, so screen reader users get the full data set.
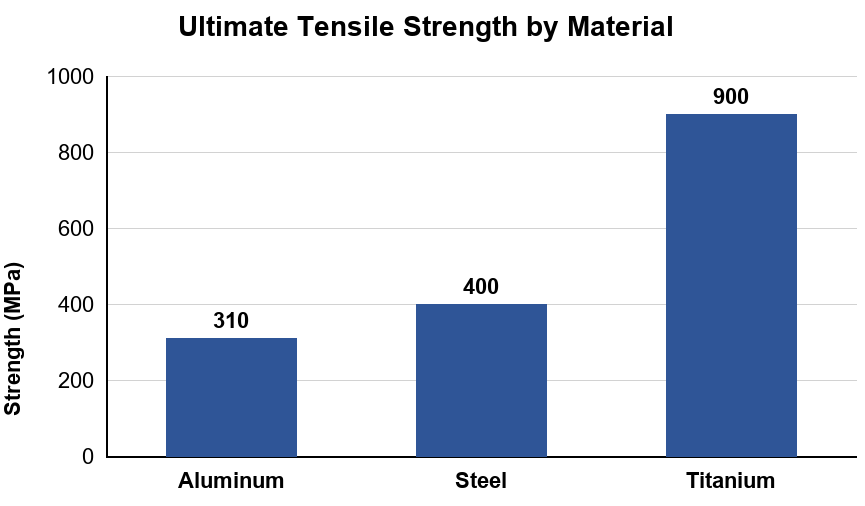
Alt text: Bar chart comparing ultimate tensile strength: aluminum 310, steel 400, and titanium 900 MPa.
Caption: Ultimate tensile strength of three structural materials. Full values are in the data table below.
| Material | Ultimate tensile strength (MPa) |
|---|---|
| Aluminum (6061-T6) | 310 |
| Structural steel (A36) | 400 |
| Titanium alloy (Ti-6Al-4V) | 900 |
Example 2: Complex Diagram
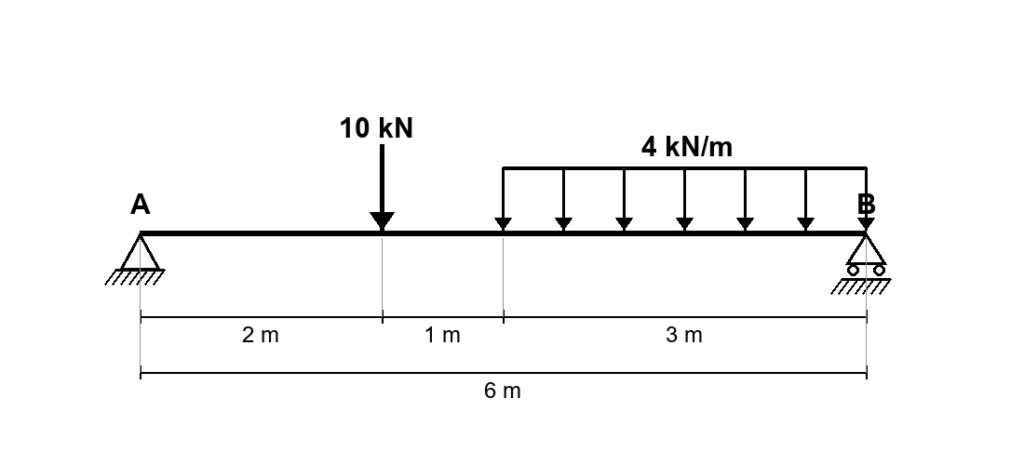
Poor: “Free-body diagram of a beam.”
Better: Pair short alt text with a longer description.
Alt text: “Free-body diagram of a simply supported beam AB with two loads; find the reactions at A and B.”
Long description: “Horizontal beam AB is 6 m long, with a pin support at A (left end) and a roller support at B (right end). A downward point load of 10 kN acts 2 m to the right of A. A uniformly distributed load of 4 kN/m runs across the right half of the beam, from 3 m to 6 m. Solve for the vertical reactions at supports A and B.”
STEM Spotlight
Don’t post equations as images. A screen reader cannot interpret the math inside an image on its own. Build equations with the Canvas equation editor (or tools like MathType or LaTeX) so assistive technology can read the math directly. If you must include an image of an equation, recreate it with an accessible equation editor, or at minimum, provide the complete equation in text beside it.
Additional Resources
- Alternative Text by WebAIM
- Digital Accessibility (UW System Administrative Policy 655 and campus resources) by Universities of Wisconsin
- Images Tutorial (especially “Complex Images”) by W3C Web Accessibility Initiative
- POET Image Description Tool (guidance for complex and STEM images) by DIAGRAM Center
- Math and MathML by Penn State Accessibility